We have a ton of trees which makes our yard nice & shady but challenging to plant perennials. I like to do some annuals but truly I love the ease of plants/flowers coming up year after year without a lot of work on my part. I have carved out one spot of sun to have a flower garden. And you guessed it—there are perennials in it.
Money Saving
Ruined Meals aka Perfect Pot of Rice
1 CommentThere have been many here in the past 20 years of marriage. I still manage every once in a while to burn something.

One of the things I would do regularly in the early days of our marriage is burn rice. Steve LOVES rice. I don’t think I can relay how much he loves it. Seriously if I was out of everything in the house he would be satisfied if I would cook a big pot of rice & put it on the table. The kids have taken after him in this—well all except one(that’s my boy!) Oh and it doesn’t matter if it is white or brown rice. They are both accepted here! I push the brown but occasionally we have the white for a treat.
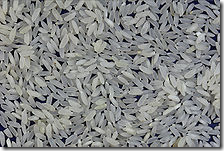
My parents hardly EVER ate rice and if we did it was minute rice. I tried that ONCE with Steve & he just looked at me like “What is this?” The only “real” rice in his book is the kind that you boil for 20-30 minutes.
Now one big thing in in this equation is that when we were first married, we had glass cookware. I am not sure anyone can keep from burning rice in glass cookware. It heats up faster than metal therefore the rice touching the glass would cook WAY faster than the rest of it & would burn every single time. I also probably turned the burner up too high—hurrying it because I was used to minute rice that was done . . . well . . . in a minute.
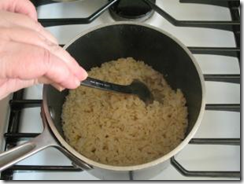
Perfect rice isn’t a hard recipe-in fact my 8 year old can cook it. But you have to know how to make it.
It takes 2 ingredients—rice & water.
The ration is 1:2. So if you want to cook 2 cups of rice you use 4 cups of water. That is the amount I regularly cook for my family of 6 when we have it as a side dish.
I use Pampered Chef cookware right now—I was a consultant for quite a few years. It is nonstick & easy to use. The right tools make all the difference. Remember that rice gets bigger as it cooks so don’t choose a pan that is just big enough to hold your water because soon the rice will overflow the pan.
Step 1: Put your water & rice in your pan and bring it to a boil. Now you can keep it at that temperature but you may have it over flow the pot as it boils & then it will be a big mess. Then you will need to know how to clean your stove top. I do this regularly so don’t feel bad.
Step 2: A better way is to turn down the heat & let it simmer. As the rice gets close to done you will notice there isn’t as much water in the pot.
Step 3: When you can no longer “see” the water under the rice it is a good time to turn the heat all the way down to the lowest setting. Let it cook just a few more minutes & then turn it off. Don’t remove the lid! The rice will continue to cook a bit if you keep the heat in.
Notice I didn’t put any time amounts on this. Rice takes about 20-30 minutes but it depends on how hot your burner is and the kind of pot you are using. So play with it & see how it works for you.
By the way rice is VERY inexpensive so if you have a crew to fee & they like rice it is a money saving meal! If you love Mexican check out the recipe below
Mexican Rice
2 cups brown rice
2 T olive oil
1 (6 oz) can tomato sauce
4 cups water
1/4 cup chopped onion
1 crushed garlic clove or 1 tsp garlic powder
1 tsp salt
Heat oil in pot & add brown rice. Stir over high heat until it turns opaque and white. Keep stirring until it turns golden brown. Mix tomato sauce, water, oinion, garlic & salt. Cover and turn to a very low heat. Let cook for 1 hour. Don’t lift the pot lid or stir it. I promise if you leave it be then you will have perfect Mexican rice!


Removing hard water deposits
6 CommentsWe have hard water. It is just a fact of life. We don’t have a water softener for various reasons but it creates problems with cleaning.
Things seem to get cemented on and I cannot “clean” them off with normal human effort.

I had a “Duh!” moment yesterday. I was looking at the spill catch underneath the water dispenser on the front of our refrigerator. It was “GROSS” and I wasn’t looking forward to spending an hour scrubbing it with baking soda to get the discoloration and build up off of it. However I couldn’t ignore it any more.

Then I had a thought. Steve used vinegar to clean out the humidifier that we use in the kids rooms when they are sick. It seems to collect those hard water crystals super fast—probably the process it goes through to cause the water vapor.
So I went out to get the big jug of vinegar out of the garage. I filled up the spill catch & walked away for a few minutes to do something. When I returned—WOW! I couldn’t believe it. The scum was gone almost gone & I was kicking myself because I didn’t take a “before” picture. Anyway you’ll have to take my word for it.
However there is one other place that was developing a bit of a sick look. It is around the drain in our main bathroom—where I shower. ICK! I convinced Elizabeth to go and try out my cure for hard water deposits! I went with camera in hand to check it out a few minutes later. Here is what I found.
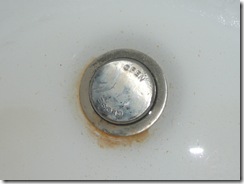
Kinda gross huh?
But after my magic(ha!) cure? Here is what I had to look at.

Sometimes it is the small things in life that make me happy. I don’t like using chemicals around the house so using something this simple just made my day! Not to mention that vinegar is SO much cheaper than any other cleaner I have tried on yucky water deposits!
What other “homemade solutions” do you use? Please share!
Linked up at
DIY Cream Soup Mix
In the Kitchen6 CommentsMy husband really doesn’t like food that has been over salted. Even peanuts he prefers the ones lightly salted or unsalted.
I try making our meals lower in sodium by making my own cream of _____ soup. It is also saves me $$$—have you seen how much a can of soup costs? Yikes!
Use the mix below as a basis for your soup and then add the ingredient that forms the flavor of the soup. Chop mushrooms, saute a bit in some olive oil & you have cream of mushroom soup with out the mega sodium & preservatives. Chop celery for cream of celery or chop chicken for cream of chicken.
DIY Cream Soup Mix
2 cups nonfat dry milk powder
3/4 cup cornstarch
1/4 cup instant reduced sodium chicken or beef bouillon granules
1/2 tsp dried thyme leaves
1/2 tsp dried basil leaves
1/4 tsp white pepper
Combine all ingredients and mix well with wire whisk until blended. Store in an airtight container.
To prepare:
As a substitute for 1 can of condensed cream soup in recipes, stir together 1/3 cup dry mix & 1-1/4 cup water in a glass bowl or sauce pan. You can microwave this—stirring every 30 seconds—for 2 minutes. Also it can be heated on the stove while stirring. I use the microwave because it is faster that way—just don’t for get to stir! The mix makes the equivalent of 9 cans. For cream of chicken you might want to use chicken broth instead of water to help with the flavor.


Linked up at
Money Saving Monday: Saving Mushroom$
2 CommentsI hate throwing food away. Especially when it has slid to the back of the refrigerator & been forgotten.

Mushrooms often are that way around here. We open a package and use 4-5 and then the rest well when I find them a week later they just go in the trash. I HATE that because it feels like I am throwing $ in the trash. Which in a way I guess I am.
My brilliant hubby read the package of the mushrooms(I swear I’ve never seen this) and it said to put the unused mushrooms in a paper bag in the frig.

He did that & told me about it later. Then I promptly forgot about them. When I went to make a recipe that needed a few mushrooms I stomped my food & said “I bet those are BAD!” Frustrated I opened the bag and WOW they were fine! A little dried out and wrinkly but not slimy and bruised as they are usually in the blue container they come home in.

So I am not out to save the world just trying to save a few bucks & mushrooms along the way. Do you have any cool tricks to share on how to keep food fresh a bit longer?


