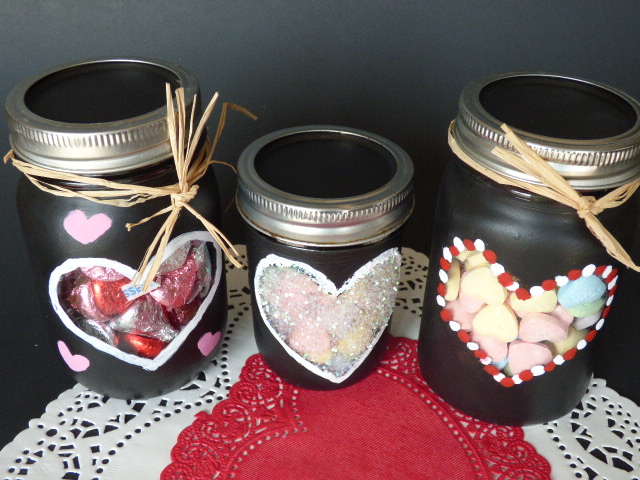
I'm a mason jar addict. So when I decided to make a candy jar for Valentine's Day I KNEW that I should use a Mason jar!
I mean what is more useful around the house! If you doubt me check out all these Mason jar ideas.
Yes I have a Mason jar Pinterest board. I'm so addicted.
I'm pretty much the anti-sugar mom and that doesn't mesh well with all the fun Valentine's Day candy's!
But my hubby and kids love it so I try to find a balance. Some candy and then some homemade love notes that aren't going to raise their blood sugar! That will keep the candy to a minimum! I LOVE chalkboard paint for so many reasons but in this situation it lets me label the jars so that I could see who was "over-indulging" after we put the candy out!
I've only used paint brushes to put on chalkboard paint but I know that there is spray on paint as well. Without a good place to use a spray inside I decided to try painting it on. I wasn't sure if it would stick well to the glass but it DID! No primer or anything.
This article contains an affiliate link. I earn a commission on sales made through my links. I only promote products I love and any sales I make help me to create valuable content that stays free to you.
Instructions for chalkboard painted mason jars
1. Cut out hearts to "block" the chalkboard paint--use your Cricut(affiliate) or Silhouette if you own one. If you don't--get one--seriously it will change your crafting life!
2. Stick the heart on your jar with double stick tape. Don't use spray adhesive--trust me on this! I had adhesive stuck in my heart and so I got creative with some glitter. Craft save!
3. Paint the jar with chalkboard paint and let dry for 15 minutes or so while you plot out your bling! I had to do two coats to get it totally covered. Painted over the paper heart to make sure to get good edges.
**NOTE: There was a little bleeding of the pain under the heart. Since I planned to paint that I wasn't too worried about it. The double stick tape did a pretty good job but was still loose enough to pull the heart off without making a huge mess of the wet paint. You can see my first try with spray adhesive. Messy looking. I put glitter on this one.
4. Paint your jar lids and let them dry while you "decorate" the jars.
5. Add heart finger prints, paint on stripes or dots, stickers or any fun glittery things. Or leave them plain without a lot of color. I snapped this to show a friend and I love just the black and white too!
6. Add lid and some ribbon or raffia and then fill them with candy! My kids are already raiding the kisses and conversation hearts! So fun!
Now for the BEST part! This Valentine's mason jar craft is part of the BLING on the Crafts Blog hop! Which means there are 9 other wonderful crafts to see!
Go on over to the other participating blogs and check out their awesome crafts as well! After you are done make sure you fill out the rafflecopter and enter to win the $100 prize!
P.S. I Love You Crafts | Glitter Valentine's Day Card
The Inspiration Vault | Glittery Happy Valentine's Day Sign
Our Crafty Mom | Valentine's Day Gift Idea
My Pinterventures | Fortune Cookie Pillow
Intelligent Domestications | DIY Monogrammed Gift Bags
Day to Day Adventures | Chalkboard Paint Mason Candy Jar
Craft Create Calm | Heart Wall Decor
Of Faeries and Fauna Craft Co. | Beaded Valentine's Day Banner
Recent posts


